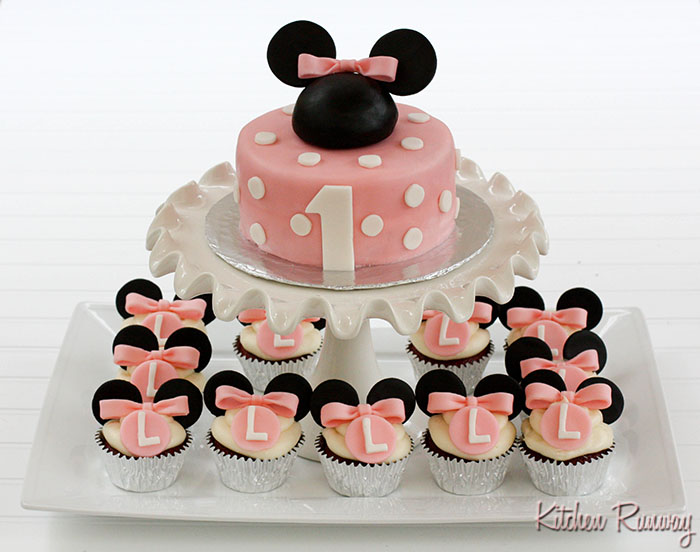
I recently baked and decorated a Minnie Mouse cake and cupcakes for my friend, Aysha. Her baby girl was turning 1 and the theme of the party was Minnie Mouse. I was excited to help and be part of the celebration, but at the same time…I also started to doubt myself. I kinda freak out when I’m asked to make something for someone else. Do you know what I mean? I’m afraid that I’m not going to be able to meet their expectations and it’s something that I often struggle with. It’s like a Richard Blais Top Chef moment – when you think everything looks good, taste good – but as soon as it hits the judges’ table you start tearing everything part – thinking of everything that you should have done to make it better. I think it’s because when I’m creating something for someone else, I’m trying to recreate their vision, which could be hard to interpret at times. It’s also a different amount of pressure especially for such a milestone event. So friends, if I seem like I’m hesitant when you ask me to bake or cook for your special occasions…it’s not that I don’t want to…it’s just that I’m afraid I’m going to disappoint. Food is something that is so personal that sometimes you forget that it’s also very subjective. I was very grateful that Aysha sent over a few different ideas to draw inspiration from so I knew what she was looking for and what she liked. She also reassured me that whatever I did was fine as long as it was pink, white and all about Minnie Mouse.
As many of you know from my previous baby 1st birthday post, I’m not an expert fondant handler or cake decorator. In fact this is only the second time that I’ve ever touched fondant. Fondant is a lot like play-doh. It’s soft, pliable and forgiving. It does require lots of patience though. You have to take your time – it is a delicate thing to work with. If you’re too rough or hasty it can tear and rip which can be very frustrating…trust me.
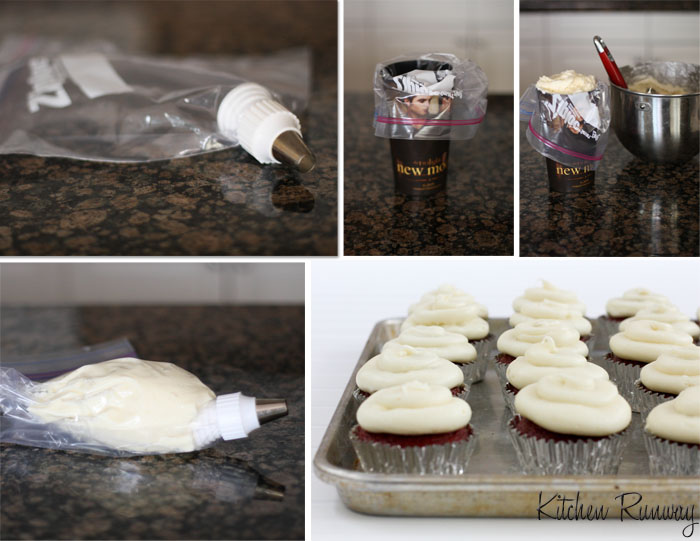
How to fill a pastry bag: I use a gallon sized freeze Ziploc bag. Cut a corner of the bag and fit it with a coupler and the tip. Place bag with the tip at the bottom in a large cup. (Yes - it's a New Moon cup - don't judge) Scoop frosting into bag. Squeeze out air bubbles and seal bag.
Here’s the list of ingredients that I used and what I did to decorate it:
Cake:
You will need a two layer 6 inch cake.
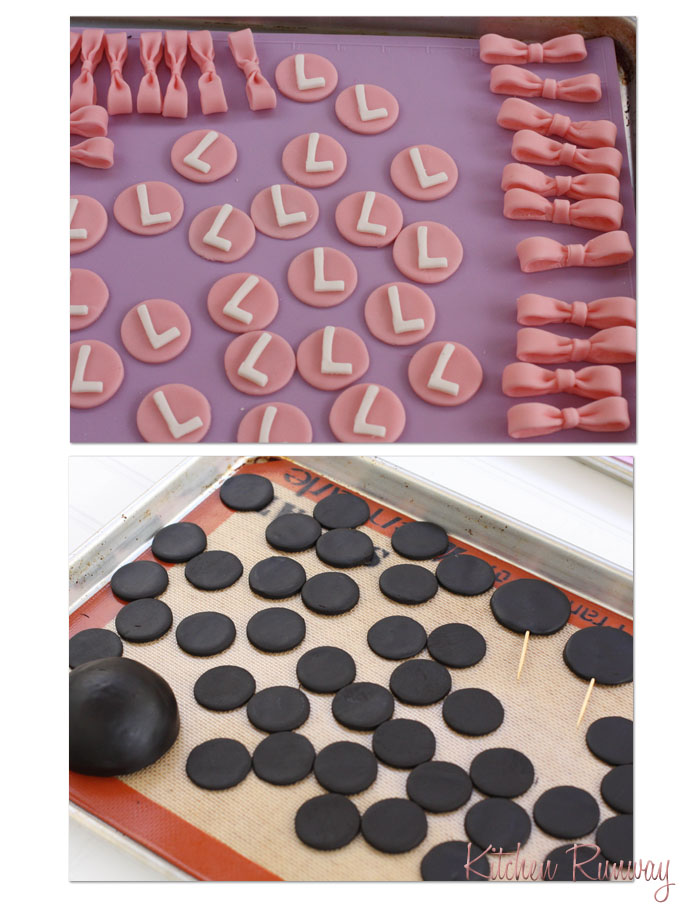
Head: The Minnie Mouse head is a 3 inch styro-foam ball that has been cut in half. This part of the cake is not edible – make sure to remove it before the baby starts to smash into the cake. I put a thin smear of frosting on the ball and covered it with Duffs (Ace of Cake) black fondant. Using a 2 inch round cookie or biscuit cutter, cut out the ears and stick tooth picks in it. You want to make that you roll the ears out on the thicker side (about 1/8 inch thick) because you want them to be able to hold up and not be flimsy. Allow the head and ears to dry at least a week. I just left them out on a silicone mat on a cookie sheet – uncovered to allow the head and ears to harden. Before the fondant on the “head” fully hardens – use a tooth pick to poke holes into the head so that the ears will have a place to slide in. Attached the ears a day before you’re ready to finish up the cake. Use a little bit of water if you need to get the ears to stick to the head.
Polka-Dots: I used Wilton white fondant. I rolled it out to about an 1/8 of an inch thick and used the Wilton Round Cut-Outs(smallest circle) to cut out the polka dots. Cut out as many as you like. Also leave these on the silicone mat to dry. These will dry out much faster than the Duff brand of fondant.
Number 1: I used the Wilton white fondant and the Martha Stewart Number Cookie Set (Thank you Jessica for this set — I use it all the time! Especially the number 1) Leave this out to dry as well.
Cake: Roll the fondant out to about 1/8 inch thick about 10 – 11 inches in diameter. Frost cake with a light coating of frosting and then place fondant on cake. Follow the directions on the fondant packaging on how to cover the cake. Make sure there are no air bubbles. Do this the day of or night before.
Cupcakes:
Ears: I used the same Duff Black Fondant and used the medium sized circle from the Wilton Round Cut-Out set. I find that it’s easier if you roll the fondant out on the silicone mat, cut out the ears (in this case I cut out 48 circles for 24 cupcakes) Then peel the left over fondant off. This prevents you from having to lift the ears and transfer them which will probably disfigure your perfect circles. Let these sit out to harden up for at least a week.
Circle with L: I used Duff White Fondant and colored with red icing coloring to obtain the desired shade of pink. It’s best to color enough for the whole project (to cover the cake, make circles & bows) at one time because it is very difficult to recolor a second batch to match exactly. You will need about ½ to 2/3 of the 2 lbs. container of fondant to make all of the pink parts. Roll the fondant to about 1/8 of an inch and use the middle size circle for the Wilton Round Cut-Out set.
Bows: Roll the fondant out to about 1/8 inch thick. Using a pizza cutter and ruler to cut out 3/8 inch x 5 inch strips. I roll my fondant on a Wilton Roll & Cut Mat or a silicone mat. The Roll & Cut Mat is nice because there are grid lines and circles to help guide you for easier rolling and cutting. Let the fondant sit out and dry for about a day. This will allow the fondant to be firm enough to mold into a bow and stay. Pinch the ends of the strips and bring towards the center. The fondant should still be sticky enough to stick to itself. Firmly press the pinched ends into the center of the strip to form a bow. Now cut a small strip a little less than a ¼ of an inch to cover the pinched ends to complete the bow. Let these sit out to dry for at least a week. The larger bow for the Minnie head is ½ inch x 6 inch strip.
L: I used the Wilton white fondant and the alphabet cutters. I also let these dry out and then attached it to the pink circles the day that I’m ready to use them. (just put a little bit of water on the back of the “L” and adhere to the pink circle. ) These can be rolled thinner than the pink circles – a little thicker than 1/16 of an inch is fine.
When you’re ready to assemble:
1) Cover cake with pink fondant.
2) Place the head in the center of the cake. The pink fondant should be sticky enough for the black fondant to adhere to. If not use a bit of water to help it stick.
3) Place white polka dots around the top of the cake, using a tiny bit of water to help the polka dot stick. Place the number one on the front side of the cake. Arrange the rest of the dots around the side of the cake. Use water to adhere.
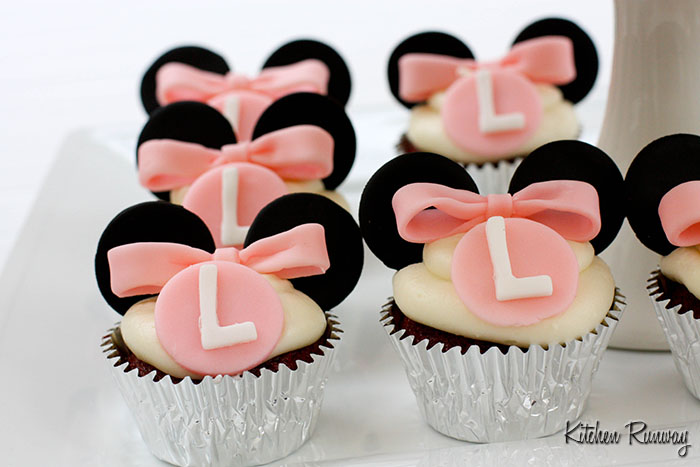
4) Cupcakes: using a large round tip, pipe frosting onto the cupcakes. Place the ears on first, then the bow and last the “L” medallion.
Ta – Da! Minnie Mouse cake & cupcakes!
Tips:
-
You should roll, cut and allow the fondant pieces to dry out on a silicone mat for at least a week. Half way through the week, I flip the pieces (except for the bows) so that both sides have an opportunity to dry.
-
I either roll my fondant on the Roll & Cut Mat or a silicone mat. Follow the directions on your fondant package. Sometimes heating the fondant for a few seconds will help make the fondant more easy to work with. Be careful to not over heat. Sprinkling powder sugar on the mat and rolling pin will help you with the handling of the fondant.
-
I use an off set spatula to help me get under and lift the fondant from the mat.
-
Make sure to wrap unused fondant in plastic wrap and store in an air tight container.
-
You can bake your cake a head of time and wrap tightly in plastic wrap and place the cake in a Ziploc freezer bag until ready to decorate. Make sure the cake completely thaws before frosting and covering with fondant.
-
Water is like glue when dealing with fondant. Remember a little goes a long way.
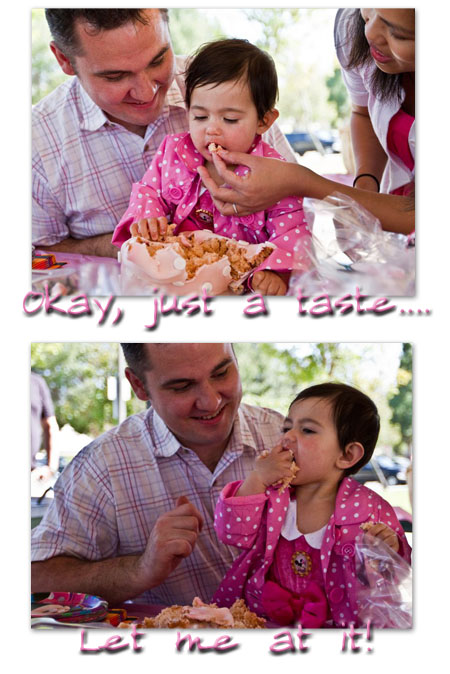
I think she likes it! Happy Birthday Little One!
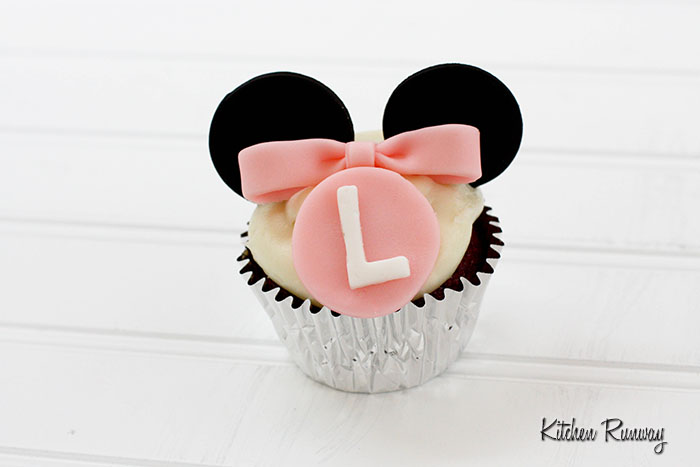

They are so beautiful!!! Wonderful work 🙂 Simply stunning!
Darling perfection!
That cake is too cute! I think you did a wonderful job!
your right these turned out adorable!! great job!
Absolutely Adorable!!
Great looking stuff there! Out of three of us riding together to Camp Blogaway, both you and Kim made some spectacular fondant cakes, which leaves me to prove that we can still doing even though we were late:)
I wish my girls are still small to make these:) You are pretty talented young woman, Quyen!
This is SUPERRR CLASS!! 😀 Making this for my baby sister’s Birthday! She saw it and now going crazy over it ‘minnie cakes! minnie cakes! lol. xx
Diane{CreatedbyDiane}, Sue, Kenni, Erin, Beth: Thank you so much!! You all are so kind!
Lana: 🙂 yup….late to Wilton University — I’m sure my technique is all wrong – hee,hee all well!
Coco: Oh – she’s going to love it! Can’t wait to see pictures of what you create for her birthday! Take care!
Seriously, how can you doubt yourself! Fantastic job – I have never touched fondant and probably never will, but I know who to call if I need a gorgeous cake with personality 🙂 Great seeing you today!
Priscilla – She’s Cookin’: Awww – thank you!! It was greating seeing you again today! There just never seems to be enough time to catch up! Take care!
Do you have a recipe for the frosting on the cupcakes? I cant find one that puddles like that, thats exactly what I want mine to do!
Thanks for sharing, my 11 year old daughter wants a cake like this! So cute!
Alycia: Hi! I do — it’s a basic cream cheese frosting recipe. I hope to post it soon! Take care! I’m sure your daughter is going to have a wonderful birthday party!!
Where did you find the cake stand?! I want to get one.
Kitchenrunway the cake and cupcakes are amazing. My little girl and I listen/watch Mickey Mouse Clubhouse every morning. Her 1st bday is in June and i want to personally make her cake. Im going to start perfecting this ASAP. AGAIN AMAZING
Kimberly R: The ruffled cake stand is from Costco!! 🙂 Fun right?
Quisha: Thank you so much!! How sweet that you and your daughter share that time together! I know she’s just going to adore the Minnie mouse cake (right before she smashes it) 🙂 I can’t wait to see the pictures – please do share next June! Take care!!
Thanks so much for this idea and instructions. I just made them for a friend’s niece’s first birthday. They turned out great
Thank you for sharing! I’m looking for ideas, my daughter is turning one and her theme is Minnie 🙂
just brilliant! Superb, would love to try it for my neice….keep up the great work! 🙂
Sheila: I’m so happy that it was helpful! 🙂 Happy baking and decorating!
Yvette: How fun! Happy Birthday to your daughter!
Mahawish: Thank you – you have one very lucky niece and you’re one fabulous aunt!
I was browsing for Mickey & Minnie Mouse cake ideas and found your page. It’s so pretty! Good job.. And thanks for sharing.. 😉
Ting: Thank you so much! Have a great day!
Simply adorable!!!
I just wanted to say that I fell in love with your cupcakes while searching for ideas for my daughter’s Minnie Mouse Bowtique birthday party. I have to thank you so much for walking me through making the bows and ears. I made a rendition of the cupcakes and they were a huge hit!
Regena: Thank you!! 🙂
Michelle: Yay! I’m so glad that it was helpful for your daughter’s Minnie Mouse “Bowtique” birthday party! What a fun theme! If you have pictures – I would love to see them! Take care and thank you for visiting!
I WANT A MINNIE MOUSE CAKE FOR MY DAUGHTER’S 2ND BIRTHDAY AND THE 1 THAT YOU MADE WOULD BE PERFECT!!! I LOVE IT!!!
i just love your minnie mouse cup cakes, thank you so much for making it so easy, i will be making these cup cake for a baby shower, it’s going to be so easy and yet it looks like i work really hard. the shower is going to be a hit
thank you so much
Brandie Julie Kinslow
3/21/2013